In this tutorial, we'll learn how to use the Google Cloud Pub/Sub with Spring Boot and Quarkus.
Google Cloud Pub/Sub is a fully-managed real-time messaging service that allows you to send and receive messages between independent applications. It is a scalable, durable, and highly available messaging service that can be used to decouple applications and components deployed on Google Cloud.
Prerequisites
- JDK
- Kotlin
- Spring Boot
- Gradle or Maven
- Docker and Docker Compose
- An Integrated Development Environment (IDE) such as IntelliJ IDEA or Eclipse or VS Code
Run the Google Cloud Pub/Sub Emulator
To run the Google Cloud Pub/Sub Emulator, you can use the following Docker Compose file:
version: '3.9'

services:

  pubsub-emulator:
    image: gcr.io/google.com/cloudsdktool/cloud-sdk:466.0.0-emulators
    container_name: pubsub-emulator
    ports:
      - "8685:8685"
    volumes:
      - ./init-pubsub.sh:/init-pubsub.sh
    entrypoint: ["/init-pubsub.sh"]
    restart: always
The init-pubsub.sh script is used to start the emulator, create a topic and a subscription:
#!/bin/sh

# Start the Pub/Sub emulator
gcloud beta emulators pubsub start --host-port 0.0.0.0:8685 --project=sample-project-id &

# Wait for the emulator to start (adjust sleep time as needed)
sleep 5

# Create Pub/Sub topics
curl -s -X PUT 'http://0.0.0.0:8685/v1/projects/sample-project-id/topics/user-created-topic'

curl -s -X PUT 'http://0.0.0.0:8685/v1/projects/sample-project-id/topics/user-created-json-topic'

# Create Pub/Sub subscriptions
curl -s -X PUT 'http://0.0.0.0:8685/v1/projects/sample-project-id/subscriptions/user-created-topic-sub' \
    -H 'Content-Type: application/json' \
    --data '{"topic":"projects/sample-project-id/topics/user-created-topic"}'

curl -s -X PUT 'http://0.0.0.0:8685/v1/projects/sample-project-id/subscriptions/user-created-json-topic-sub' \
    -H 'Content-Type: application/json' \
    --data '{"topic":"projects/sample-project-id/topics/user-created-json-topic"}'

# Keep the script running to keep the container alive
tail -f /dev/null
Make sure that the init-pubsub.sh script is executable:
chmod +x init-pubsub.sh
The & at the end of the emulator start command is used to run the emulator in the background. The tail -f /dev/null command is used to keep the container alive.
Check if topics and subscriptions were created successfully:
curl -X GET 'http://0.0.0.0:8685/v1/projects/sample-project-id/topics'

curl -X GET 'http://0.0.0.0:8685/v1/projects/sample-project-id/subscriptions'
Publish to a Google Cloud Pub/Sub Topic
To publish to a Google Cloud Pub/Sub topic, you can use the following curl command:
curl -X POST "http://0.0.0.0:8685/v1/projects/sample-project-id/topics/user-created-topic:publish" \
-H "Content-Type: application/json" \
-d '{
  "messages": [
    {
      "attributes": {
        "DOMAIN_OBJECT_ID": "12345",
        "anotherKey": "anotherValue"
      }
    }
  ]
}'
Or using json data:
curl -X POST "http://0.0.0.0:8685/v1/projects/sample-project-id/topics/user-created-json-topic:publish" \
-H "Content-Type: application/json" \
-d '{
  "messages": [
    {
      "attributes": {
        "DOMAIN_OBJECT_ID": "12345",
        "anotherKey": "anotherValue"
      },
      "data": "eyJET01BSU5fT0JKRUNUX0lEIjogIjEyMzQ1IiwgIm5hbWUiOiAiSm9obiBEb2UifQ=="
    }
  ]
}'
The actual json data is {"DOMAIN_OBJECT_ID": "12345", "name": "John Doe"}, but it must be base64 encoded.
Also see Publishing json message to PubSub
The first example does not use the data property, since it is optional.
You'll have to use at least one property in attributes or data or both.
Later, we'll use a Spring Boot application and a Quarkus application to publish to a Google Cloud Pub/Sub topic.
Pull from a Google Cloud Pub/Sub Subscription
To pull from a Google Cloud Pub/Sub subscription, you can use the following curl command:
curl -X POST "http://0.0.0.0:8685/v1/projects/sample-project-id/subscriptions/user-created-topic-sub:pull" \
-H "Content-Type: application/json" \
-d '{
  "maxMessages": 10
}'
Or from the user-created-json-topic subscription:
curl -X POST "http://0.0.0.0:8685/v1/projects/sample-project-id/subscriptions/user-created-json-topic:pull" \
-H "Content-Type: application/json" \
-d '{
  "maxMessages": 10
}'
When the message is only pulled, PubSub will keep the message, unless it is acked.
The return value of a pull should look similar to this:
{
  "receivedMessages": [{
    "ackId": "projects/sample-project-id/subscriptions/user-created-topic-sub:1",
    "message": {
      "attributes": {
        "DOMAIN_OBJECT_ID": "12345",
        "anotherKey": "anotherValue"
      },
      "messageId": "1",
      "publishTime": "2023-11-07T23:04:40.028Z"
    }
  }]
}
You can acknowledge these messages by using the given ackId and calling the following:
curl -X POST "http://0.0.0.0:8685/v1/projects/sample-project-id/subscriptions/user-created-topic-sub:acknowledge" \
-H "Content-Type: application/json" \
-d '{
  "ackIds": [
    "projects/sample-project-id/subscriptions/user-created-topic-sub:1"
  ]
}'
Later, we'll use a Spring Boot application and a Quarkus application to pull from a Google Cloud Pub/Sub subscription.
Spring Boot Project
Start by creating a new Spring Boot project. You can use the Spring Initializer (https://start.spring.io/) or your IDE to generate a new project.
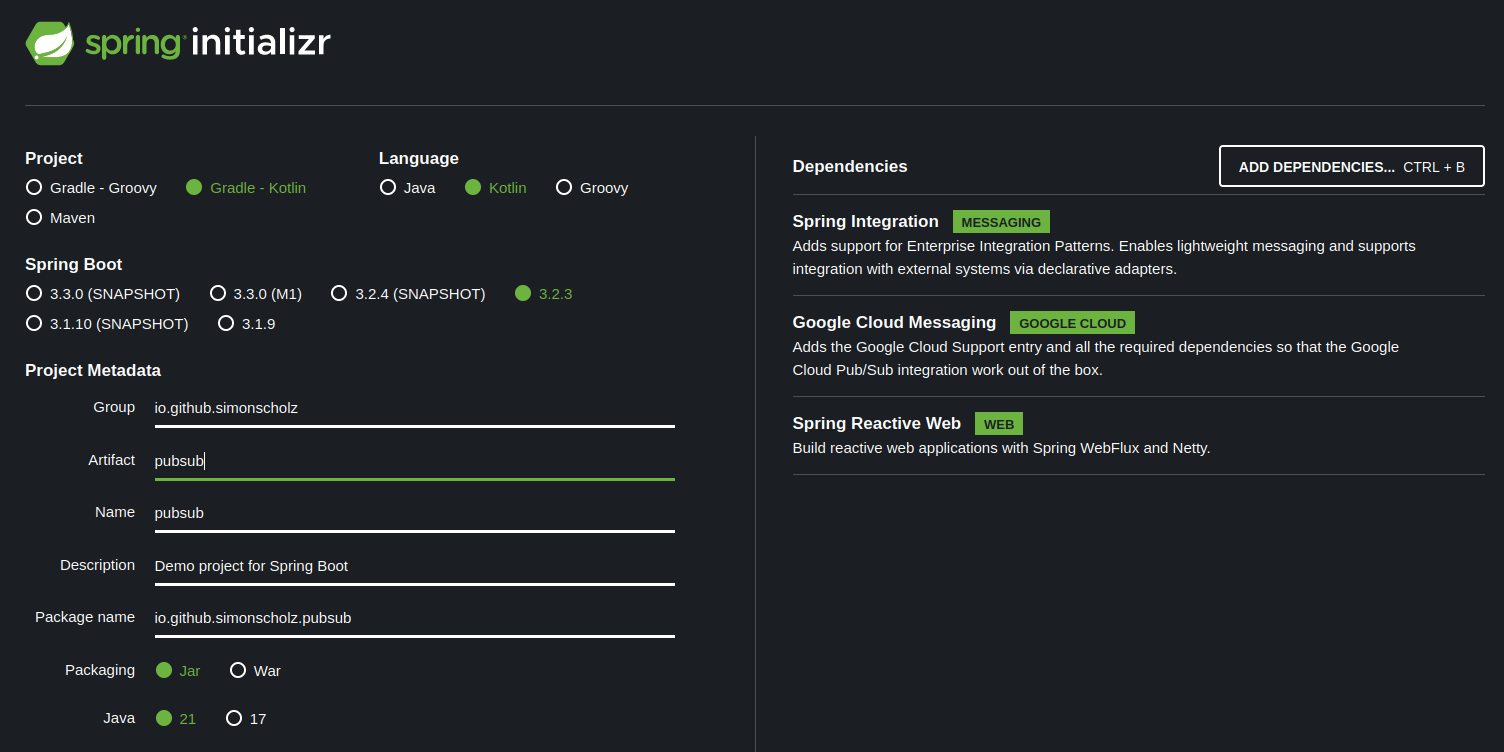
You just need to make sure to add the following dependencies:
implementation("org.springframework.boot:spring-boot-starter-integration")
implementation("com.google.cloud:spring-cloud-gcp-starter-pubsub")

// optional, but helpful to use rest to test publishing
implementation("org.springframework.boot:spring-boot-starter-webflux")
Configure Application Properties
In the application.properties or application.yml file we need to configure the Google Cloud Pub/Sub project ID and the Google Cloud Pub/Sub emulator host:
---
spring:
  cloud:
    gcp:
      project-id: sample-project-id
      pubsub:
        emulator-host: "localhost:8685"
General GCP Configuration
To configure the Google Cloud project ID and credentials, we need to create a @Configuration like this:
package io.github.simonscholz.pubsub

import com.google.api.gax.core.CredentialsProvider
import com.google.api.gax.core.NoCredentialsProvider
import com.google.cloud.spring.core.GcpProjectIdProvider
import org.springframework.beans.factory.annotation.Value
import org.springframework.context.annotation.Bean
import org.springframework.context.annotation.Configuration
import org.springframework.context.annotation.Profile

@Configuration
@Profile("local")
class GcpConfig {
    @Bean
    fun projectIdProvider(
        @Value("\${spring.cloud.gcp.project-id}") projectId: String?,
    ): GcpProjectIdProvider {
        return GcpProjectIdProvider { projectId }
    }

    @Bean
    fun credentialsProvider(): CredentialsProvider {
        return NoCredentialsProvider.create()
    }
}
Of course this only applies for the use of the Google Cloud Pub/Sub emulator. If you want to use the Google Cloud Pub/Sub in production, you can configure the Google Cloud project ID and credentials differently. On how to do this with secrets, environment variables and terraform see later sections of this tutorial.
Subscribe to a Google Cloud Pub/Sub Topic
To subscribe to a Google Cloud Pub/Sub topic, we need to create a @Configuration like this:
package io.github.simonscholz.pubsub

import com.google.cloud.spring.pubsub.core.PubSubTemplate
import com.google.cloud.spring.pubsub.integration.AckMode
import com.google.cloud.spring.pubsub.integration.inbound.PubSubInboundChannelAdapter
import org.springframework.beans.factory.annotation.Qualifier
import org.springframework.context.annotation.Bean
import org.springframework.context.annotation.Configuration
import org.springframework.integration.channel.DirectChannel
import org.springframework.messaging.MessageChannel


@Configuration
class PubSubConfig {

    @Bean
    fun messageChannelAdapter(
        @Qualifier("pubsubInputChannel") inputChannel: MessageChannel,
        pubSubTemplate: PubSubTemplate,
    ): PubSubInboundChannelAdapter =
        PubSubInboundChannelAdapter(pubSubTemplate, "user-created-json-topic-sub").apply {
            outputChannel = inputChannel
            setAckMode(AckMode.MANUAL)
        }

    @Bean
    fun pubsubInputChannel(): MessageChannel = DirectChannel()
}
When having the PubSubInboundChannelAdapter bean and MessageChannel bean, the @ServiceActivator bean will be called when a message arrives.
There are many different ways to use a @ServiceActivator, the following examples will illustrate some of them.
Using a MessageHandler bean
You can use a MessageHandler instance to subscribe to a Google Cloud Pub/Sub topic:
package io.github.simonscholz.pubsub

import com.google.cloud.spring.pubsub.core.PubSubTemplate
import com.google.cloud.spring.pubsub.integration.AckMode
import com.google.cloud.spring.pubsub.integration.inbound.PubSubInboundChannelAdapter
import com.google.cloud.spring.pubsub.support.BasicAcknowledgeablePubsubMessage
import com.google.cloud.spring.pubsub.support.GcpPubSubHeaders
import org.slf4j.Logger
import org.slf4j.LoggerFactory
import org.springframework.beans.factory.annotation.Qualifier
import org.springframework.context.annotation.Bean
import org.springframework.context.annotation.Configuration
import org.springframework.integration.annotation.ServiceActivator
import org.springframework.integration.channel.DirectChannel
import org.springframework.messaging.MessageChannel
import org.springframework.messaging.MessageHandler


@Configuration
class PubSubConfig {

    @Bean
    fun messageChannelAdapter(
        @Qualifier("pubsubInputChannel") inputChannel: MessageChannel,
        pubSubTemplate: PubSubTemplate,
    ): PubSubInboundChannelAdapter =
        PubSubInboundChannelAdapter(pubSubTemplate, "user-created-json-topic-sub").apply {
            outputChannel = inputChannel
            setAckMode(AckMode.MANUAL)
        }

    @Bean
    fun pubsubInputChannel(): MessageChannel = DirectChannel()

    @Bean
    @ServiceActivator(inputChannel = "pubsubInputChannel")
    fun messageReceiver(): MessageHandler =
        MessageHandler { message ->
            LOGGER.info("Message arrived! Payload: ${String((message.payload as ByteArray))}")
            LOGGER.info("Headers: ${message.headers}")
            val originalMessage: BasicAcknowledgeablePubsubMessage? = message.headers.get(GcpPubSubHeaders.ORIGINAL_MESSAGE, BasicAcknowledgeablePubsubMessage::class.java)
            LOGGER.info("Data: ${originalMessage?.pubsubMessage?.data?.toStringUtf8()}")
            LOGGER.info("Attributes: ${originalMessage?.pubsubMessage?.attributesMap}")
            originalMessage?.ack()
        }

    companion object {
        private val LOGGER: Logger = LoggerFactory.getLogger(PubSubConfig::class.java)
    }
}
Using a @ServiceActivator with @Payload and @Header annotations
You can use a @ServiceActivator with @Payload and @Header annotations to subscribe to a Google Cloud Pub/Sub topic:
package io.github.simonscholz.pubsub

import com.google.cloud.spring.pubsub.support.BasicAcknowledgeablePubsubMessage
import com.google.cloud.spring.pubsub.support.GcpPubSubHeaders
import org.slf4j.LoggerFactory
import org.springframework.integration.annotation.ServiceActivator
import org.springframework.messaging.handler.annotation.Header
import org.springframework.messaging.handler.annotation.Payload
import org.springframework.stereotype.Component

@Component
class Receiver {

    @ServiceActivator(inputChannel = "pubsubInputChannel")
    fun messageReceiver(
        @Header(GcpPubSubHeaders.ORIGINAL_MESSAGE) message: BasicAcknowledgeablePubsubMessage,
        @Header("DOMAIN_OBJECT_ID") domainObjectId: String,
        @Payload payload: String,
    ) {
        LOGGER.info("Message arrived! ORIGINAL_MESSAGE: $message")
        LOGGER.info("DOMAIN_OBJECT_ID: $domainObjectId")
        LOGGER.info("Payload: $payload")
        message.ack()
    }

    companion object {
        private val LOGGER = LoggerFactory.getLogger(Receiver::class.java)
    }
}
It is convenient to use the @Header and @Payload annotations to obtain the message payload and headers.
There this is my preferred way to use the @ServiceActivator annotation.
Just obtain the message payload
You can even just obtain the message payload in the @ServiceActivator method:
package io.github.simonscholz.pubsub

import org.slf4j.LoggerFactory
import org.springframework.integration.annotation.ServiceActivator
import org.springframework.stereotype.Component

@Component
class Receiver {

    @ServiceActivator(inputChannel = "pubsubInputChannel")
    fun messageReceiver(payload: String) {
        LOGGER.info("Message arrived! Payload: $payload")
    }

    companion object {
        private val LOGGER = LoggerFactory.getLogger(Receiver::class.java)
    }
}
This is less explicit, but it is possible to obtain the message payload directly without using the @Header and @Payload annotations.
Test the Subscription
To test the subscription, you can use the following curl command:
curl -X POST "http://0.0.0.0:8685/v1/projects/sample-project-id/topics/user-created-json-topic:publish" -H "Content-Type: application/json" -d '{
  "messages": [
    {
      "attributes": {
        "DOMAIN_OBJECT_ID": "12345",
        "anotherKey": "anotherValue"
      },
      "data": "eyJET01BSU5fT0JKRUNUX0lEIjogIjEyMzQ1IiwgIm5hbWUiOiAiSm9obiBEb2UifQ=="
    }
  ]
}'
Watch the logs of the Spring Boot application to see the message being received.
Publish to a Google Cloud Pub/Sub Topic
The PubSubConfig can be adjusted to also provide a MessageHandler instance for outgoing messages:
  // ... other existing code

  @Bean
  @ServiceActivator(inputChannel = "pubsubOutputChannel")
  fun messageSender(pubsubTemplate: PubSubTemplate): MessageHandler {
      return PubSubMessageHandler(pubsubTemplate, "user-created-json-topic")
  }
This pubsubOutputChannel can then be used by a MessagingGateway interface:
package io.github.simonscholz.pubsub

import org.springframework.integration.annotation.MessagingGateway
import org.springframework.messaging.handler.annotation.Header

@MessagingGateway(defaultRequestChannel = "pubsubOutputChannel")
interface PubsubOutboundGateway {
    fun sendToPubsub(text: String, @Header("DOMAIN_OBJECT_ID") domainObjectId: String)
}
Note that instead of using plain text and @Header domainObjectId as parameters, you can also use a import org.springframework.messaging.Message object as parameter to get more fine grained control over the message being sent.
The PubsubOutboundGateway can then be injected into a @Service or @RestController, so that it can be used to send messages to the Google Cloud Pub/Sub topic:
package io.github.simonscholz.pubsub

import org.springframework.web.bind.annotation.PostMapping
import org.springframework.web.bind.annotation.RestController

@RestController
class SampleRestController(
    private val pubsubOutboundGateway: PubsubOutboundGateway,
) {

    @PostMapping("/send")
    fun sendToPubsub() {
        pubsubOutboundGateway.sendToPubsub(
            text = "{\"DOMAIN_OBJECT_ID\": \"12345\", \"name\": \"John Doe\"}",
            domainObjectId = "12345"
        )
    }
}
The following curl command can be used to test the SampleRestController:
curl -X POST -H "Content-Type: application/json" --data '{"DOMAIN_OBJECT_ID": "12345", "name": "John Doe"}' http://localhost:8080/send
This will then send a message to the Google Cloud Pub/Sub topic and the former created @ServiceActivator will receive the message.
Using low level Google Cloud Pub/Sub API
If you want to use the low level Google Cloud Pub/Sub API, you can use the PubSubTemplate bean to publish messages to a Google Cloud Pub/Sub topic:
package io.github.simonscholz.pubsub

import com.google.api.core.ApiFutureCallback
import com.google.api.core.ApiFutures
import com.google.api.gax.core.CredentialsProvider
import com.google.api.gax.rpc.TransportChannelProvider
import com.google.cloud.pubsub.v1.Publisher
import com.google.cloud.spring.core.GcpProjectIdProvider
import com.google.common.util.concurrent.MoreExecutors
import com.google.pubsub.v1.ProjectTopicName
import com.google.pubsub.v1.PubsubMessage
import org.slf4j.LoggerFactory
import org.springframework.stereotype.Component

@Component
class Publisher(
    gcpProjectIdProvider: GcpProjectIdProvider,
    credentialsProvider: CredentialsProvider,
    publisherTransportChannelProvider: TransportChannelProvider,
) {

    private val publisher = Publisher.newBuilder(
        ProjectTopicName.ofProjectTopicName(
            gcpProjectIdProvider.projectId,
            "user-created-json-topic",
        )
    )
        .setChannelProvider(publisherTransportChannelProvider)
        .setCredentialsProvider(credentialsProvider)
        .build()

    fun publishUserCreated() {
        val pubsubMessage = PubsubMessage.newBuilder()
            .putAttributes("DOMAIN_OBJECT_ID", "12345")
            .setData(ByteString.copyFrom("{\"DOMAIN_OBJECT_ID\": \"12345\", \"name\": \"John Doe\"}".toByteArray()))
            .build()

        val apiFuture = publisher.publish(pubsubMessage)
        ApiFutures.addCallback(
            apiFuture,
            object : ApiFutureCallback<String?> {
                override fun onFailure(throwable: Throwable) {
                    LOGGER.error("Error publishing user created event: $pubsubMessage", throwable)
                }

                override fun onSuccess(messageId: String?) {
                    LOGGER.trace("Published user created event, messageId: $messageId, PubSub-Message: $pubsubMessage")
                }
            },
            MoreExecutors.directExecutor(),
        )
    }

    companion object {
        private val LOGGER = LoggerFactory.getLogger(Publisher::class.java)
    }
}
Quarkus Project
Start by creating a new Quarkus project. You can use the Quarkus Initializer (https://code.quarkus.io/) or your IDE to generate a new project.
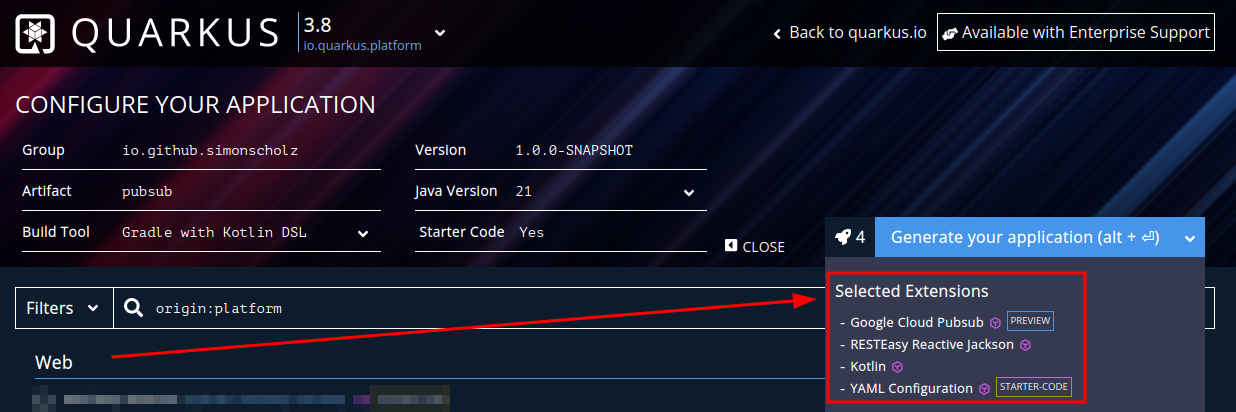
This will then have the following dependencies to your build.gradle.kts file:
    // other dependencies

    implementation(enforcedPlatform("${quarkusPlatformGroupId}:quarkus-google-cloud-services-bom:${quarkusPlatformVersion}"))
    implementation("io.quarkiverse.googlecloudservices:quarkus-google-cloud-pubsub")
I´ll finish this part once this issue is actually resolved: https://github.com/quarkiverse/quarkus-google-cloud-services/issues/595
Sources
- https://cloud.google.com/pubsub/docs/publisher#rest
- https://cloud.google.com/pubsub/docs/emulator
- https://cloud.google.com/pubsub/docs/reference/rest/v1/projects.topics
- https://cloud.google.com/pubsub/docs/reference/rest/v1/projects.subscriptions
- https://spring.io/guides/gs/messaging-gcp-pubsub/
- https://docs.quarkiverse.io/quarkus-google-cloud-services/main/pubsub.html